Friday, August 17, 2012

Protego Pullover

The sweater that almost did me in.  I mean really, this thing was the bane of my existence for the longest time.  I was this close to setting it ablaze.

I'm glad I didn't, cause my hubby LOVES it, and it feels really great to have made him something that he loves to wear with my own two hands.   Let me tell you though, knitting someone else a larger project that they love, can be a double edged sword.

Gone are the days when I'd show him some yarn and he'd say "Ohh that's nice, can you make me a hat?"  "Sure!" I'd answer, cause a hat practically flew off the needles.  Now, when I show him some yarn, his reply is almost always something to the effect of..."Ohh that's nice, do you have enough to knit me a sweater?"  Great...now all he wants are sweaters.  Those don't exactly fly off the needles in an afternoon, ya know

The fact that I knit him this sweater from looking at a few pictures online doesn't help either.  Now every time he sees a sweater he likes in a movie, he'll hit pause, and ask if I can knit him one like it.  (Currently, I'm planning out the dark brown tweed sweater that Luke Wilson wears in the last scene of The Family Stone.)  I'll get up and grab a notebook, so I can sketch out the basic design, and make some notes.

Here's the finished Protego Pullover.  I'll spare you the pic where my hubby is shaking his butt at me.


$6.50 USD


Protego - Latin for To Protect.
This pullover definitely protects the wearer from the cold! Modeled after the one Harry Potter wears in the woods in Deathly Hallows Part 1. This pullover is knit flat in pieces, then seamed together. With the right side rows all knit, and a little texture on the wrong side rows, this pullover is an easy knit that will keep you interested. Simple enough that your guy will love it, but interesting enough that you’re not bored to tears knitting it. :-)

Size:
Finished Chest Circumference 38” (42”, 46”, 50”, 54”)

Yarn:
DK weight yarn of your preference, approximately 1600 (1800, 2000, 2200, 2350) yards.

Needles:
US Size 3 (3.25mm) & US Size 4 (3.5mm) needles, or sizes needed to obtain gauge

Gauge:
5.75 sts & 10.5 rows per inch (23 sts & 42 rows = 4”) in pattern stitch on a washed and blocked swatch using US 4 needles
Pattern stitch is knit over 6 stitch repeat
Row 1: Knit
Row 2: p1, k1, p1, k3

Materials:
Stitch markers
Tapestry needle for weaving in ends
9” zipper in coordinating color
Sewing thread in coordinating color
Sewing needle

Warning:  Knitting the man in your life a sweater he loves, may result in future requests for hand knit sweaters, and frequent opportunities for stash acquisition that he'll be really happy about.  Win/win no?

xoxo,
Liz

Thursday, August 16, 2012

Rayas Cowl & Scarf

This all started as a stash busting, get something for my husband on the needles type of project.  I like to try to always have something in progress for my hubby.  I can't confirm it, but I think it makes him feel a little more loved.  I wasn't sure where it was going, but I knew I wanted stripes and color blocks. 

Enter the Rayas Scarf


As I knit and knit all those miles of garter stitch, I kept thinking to myself, "Self, you could totally borrow this from time to time.  I'm sure hubby wouldn't have a problem with it.  But maybe you should make yourself another one in different colors, just so you don't look like the wonder twins walking in the mall.  And while you're at it, make it a cowl, so you're not fumbling with trying to keep it on while running after the kids."  And so was born the Rayas Cowl


Then I said "Self, that was a good idea.  But you know what? You should totally share this with other people, so eeeeveryone can have a squishy cowl or scarf like this."

Here are the details
$3.49 USD

This is a pattern for BOTH the Cowl and the Scarf. Simple stripes and wonderful texture make this perfect for men and women.

The scarf is knit flat length-wise, then stitches are picked up at both ends to finish.
The cowl can be knit in the round, or worked flat then seamed. Instructions are provided for both methods.

Size:
Scarf – 85” x 7” (216cm x 17.75cm)
Cowl – 60” around x 7” (152.5cm around x 17.75cm)

Yarn:
Scarf: 450 Yards fingering weight in Main Color (MC)
400 yards fingering weight in Contrasting Color (CC)
Cowl: 300 Yards fingering weight in Main Color (MC)
225 yards fingering weight in Contrasting Color (CC)
I’ve added a small buffer of 15 - 25 yards for each as added insurance that you’ll have enough yarn to finish the project. When in doubt, it’s best to have more, and not less.

Needles:
US Size 5 (3.75mm) or size needed to obtain gauge

Gauge:
20 stitches = 4” in Garter stitch on washed and blocked swatch.

Materials:
Tapestry needle for weaving in ends

I cannot wait to get some cooler weather.  I'm dying to wear this bad boy.  Truth be told though...the image that I have in my head wearing the cowl, looks way cooler and much much thinner than I currently am. I can see me wearing some really cool khakis, with a denim jacket, boots and awesome jewelry like dangly earrings (which I never wear. I wear some studs that I take off only to shower), and fun bracelets.  Oh and did I mention that in said vision my butt looks great in those khakis?  shea....not likely.  Man do I need to start really working out. 


xoxo,
Liz

Wednesday, August 15, 2012

Vanilla Socks!

I've got a few new patterns up.  About time I get around to posting about them here.  Over the next week, I'll be posting here on each of them, so stay tuned!

First, a freebie.  I made my own version of vanilla socks.  I LOVE the way these fit. 

 Free!

This is a simple straight forward pattern for my favorite top-down with a heel flap Vanilla Socks. These socks are knit in stockinette with a little ribbing at the sides. The ribbing at the sides keeps these socks fitting, and not slouching.

Sizes:
small (medium, large, x-large)

Yarn:
100 grams of any fingering weight yarn
(Note: X-large may require slightly more yarn than average 100 grams)


Needles:
US 1 (2.25 mm) or any size needle that will give you the correct gauge

Gauge:
16 sts = 2” using US 1 (2.25mm) needles

Materials:
Stitch markers
Tapestry needle for weaving in ends
Scrap yarn for holding stitches


I'm working on two other pairs right now as the first two really are my favorite vanilla socks.  I'm knitting one pair in Noro Kureyon (man alive does that stuff want to tangle on itself, but they're working up so pretty, see?) and I cast on for the medium at 64 sts.  That's pretty much my personal go to number for fingering weight vanilla socks of any kind.


The other pair is some older Knit Picks Felici Sport in the colorway Too Cool.  I usually work sport weight vanilla socks at 56 sts.  While I'm on that...I keep hearing that all these people knit their regular fingering weight socks at 56 sts.  Which makes me think, hey, my feet must be bigger than I think.  But wait, I'm only a size 7.5, and I thought that was average.  So people, I'm choosing to believe that my feet are a perfectly fine and respectable size, and the rest of you have freakishly tiny feet, albeit probably really cute freakishly tiny feet.  It must be awesome to go shoe shopping with tiny feet, those smaller sizes are ALWAYS there.

Anyway, back to the socks.  These are working up pretty cool, and I keep them in a little basket on my desk.  At work (I work from home) we have pretty regular meetings monthly, and they can run for about an hour, with a lot of listening on the phone.  I usually pick these up and knit on them during the meeting.  They're simple enough that I'm not distracted by trying to follow a pattern, and I can get everything out of that meeting, without having to sit and twiddle my thumbs.  They're slow going because they usually only get knit on during those monthly meetings, but they're not exactly the need-to-get-it-done-by-a-specific-time type of project.


And here's the other pair that I had already finished.  LOVE these socks in striping yarns.


They're super simple, great fitting, easy to knit, and the pattern is FREE!  Free is always a good thing.  Go knit some now and have toasty feet this winter.  And people...I wanna see pics!


xoxo,
Liz

Tuesday, August 14, 2012

Hexed!

Except for a quick mention in my podcast, I've never posted about this ongoing project of mine.

It's a Hexagon blanket (ravelry link) that I started back in June of 2011.  I'm using Noro Silk Garden Sock in the S269 Naturals colorway, and some Kureyon sock in the black and tan colorway.

When I first bought yarn for it, I crocheted about 20 of these hexagons and arranged them on the couch for my husband to see.  I asked him if he'd like me to make it as a throw, or a bedspread.  I guess he wasn't in love with the idea, and didn't want to have to look at it everyday on our bed, so he said throw.  Maybe he was just doubting my skillz...who knows.  Off I went crocheting hexagons, satisfied that the yarn I had was enough for a throw.  I crocheted enough of them to make a decent size throw for one person hanging out on the couch.  After being satisfied with the placement of the different hexes, I piled them in order and started seaming.  I tried crocheting them together but didn't like the ridge I was getting so I opted for seaming them with a darning needle and the same yarn.

Fast forward to after I have more than half the dang thing seamed, my husband sees it, and instantly proclaims that it's beautiful and would rather have a bedspread made out of it.  Well darling, that's great, except the yarn has been discontinued in the US and I don't know if I can get any more.  Lo and behold, they've decided to bring the yarn BACK!  Yay!

Now my only problem is that I've placed the darker hexes throughout the throw in a random, but balanced order.  I've already seamed more than half and I'm REALLY not looking forward to taking that apart.  Good news!  I found another ball of the darker colorway.  I also got my hands on 12 more skeins of the lighter colorway.  All together I've got 24 skeins invested in this thing.

I have a feeling this blanket will be an ongoing process for a very, VERY long time.  


Thursday, January 26, 2012

New Stash

So I've been watching the Flash your stash 2012 thread on Ravelry.  I actually flashed my stash on page 3 of the thread (if you're interested in seeing it).  Since then, I've added some to my stash and I've given some away.

This is my newest addition to the stash.


That's 8 skeins of Berroco Vintage in Bilberry, and 5 skeins of Mini Mochi.  I plan on a sweater for the vintage, and a Spectra scarf out of one of the colors of the Mini Mochi (just not sure which at the moment).  That'll be my second Spectra, and man, do I love that scarf.  I wear it every chance I get.  It's a great scarf, and it's so...so...ME.


(Full disclosure:  There are 9 skeins of beautiful yarn headed my way next month, but they're not here yet, so I won't count them.)

I've been working on this little number (above), and I'm in love with the sweater...the yarn, not so much.  It's the Owls sweater by Kate Davies, and I'm using Cascade Eco Wool.  It comes in these giant honking skeins, and some very pretty natural colors.  It's just...itchy...to me, anyway.  At this point, I'm loving the sweater so much I don't think I care about the itch.  I'll have to find myself a nice thickish shirt to wear under, and it'll be good.

I ended up not really using the pattern for most of it.  It's like I've got some freakish alien body that doesn't like the measurements on hand-knit sweater patterns.  Well, that, and the gauge I got, was nowhere near the right gauge.  I did use the pattern for the owls, and sort of for the decreases in the yoke.  I used my gauge swatch to calculate the cast on number, and tried it on as I went for decreasing and increasing in the body.  I used a provisional cast on for the sleeves, so that I could keep going with the yoke, then knit the sleeves down afterwards.  So far, success!  I'm getting something like 4.5 or 5 rows to the inch, and yet, I've managed to stall out on it anyway.  What is it with sleeves!!??

I've got sweaters on the brain, a severe case of cast-on-itis that I'm trying my very best to fight off, and projects that are soon to be neglected if I can't get myself together.

wish me luck!

xoxo,
Liz

Sunday, November 20, 2011

Smocking Stitch Tutorial

I'm working on a pattern that uses the smocking stitch.  I had used smocking once before on a child sized Coraline for my daughter (one that you'd think was knit from barbed wire, the way she reacts to it).  I remembered vaguely how to work the stitch, but wasn't 100% sure on the mechanics.  I knew that I had to slip stitches to a cable needle, then other stitches were slipped, and somewhere in there I had to wrap the working yarn around.  I just couldn't remember the exact order.  I googled how to work it, and found that there aren't many places on the Internet with the instructions I wanted.  You can just knit your piece in ribbing, and then use a tapestry needle with some yarn to smock the stitches after the fact, but seriously, who wants to add floats to the back of their work when it isn't necessary?  I thought I'd add my own and hopefully make it a little easier for those coming behind me.

  *Warning: this is very picture heavy.*

There are variations to the amounts of knits and purls in smocking, but the basic idea is the same.  There are knit stitches, purl stitches and more knit stitches.  The idea is, you want to wrap the knit stitches together, while leaving the purl stitches in between.  Wrapping the knits together, pulls them closer and creates the smocking in the fabric.  The smocking pattern is achieved by smocking together alternating knit columns.

In this case, we have two knit stitches, two purl stitches and then two more knit stitches.  We want to smock together the knit columns. 

Here goes.  Please forgive the single handed shots.  If I could have kit the camera trigger with my nose to get both hands in the picture, I would have.  Sadly, that doesn't work out too well.

Work your pattern until you arrive at the point where you will need to work the smocking stitches.


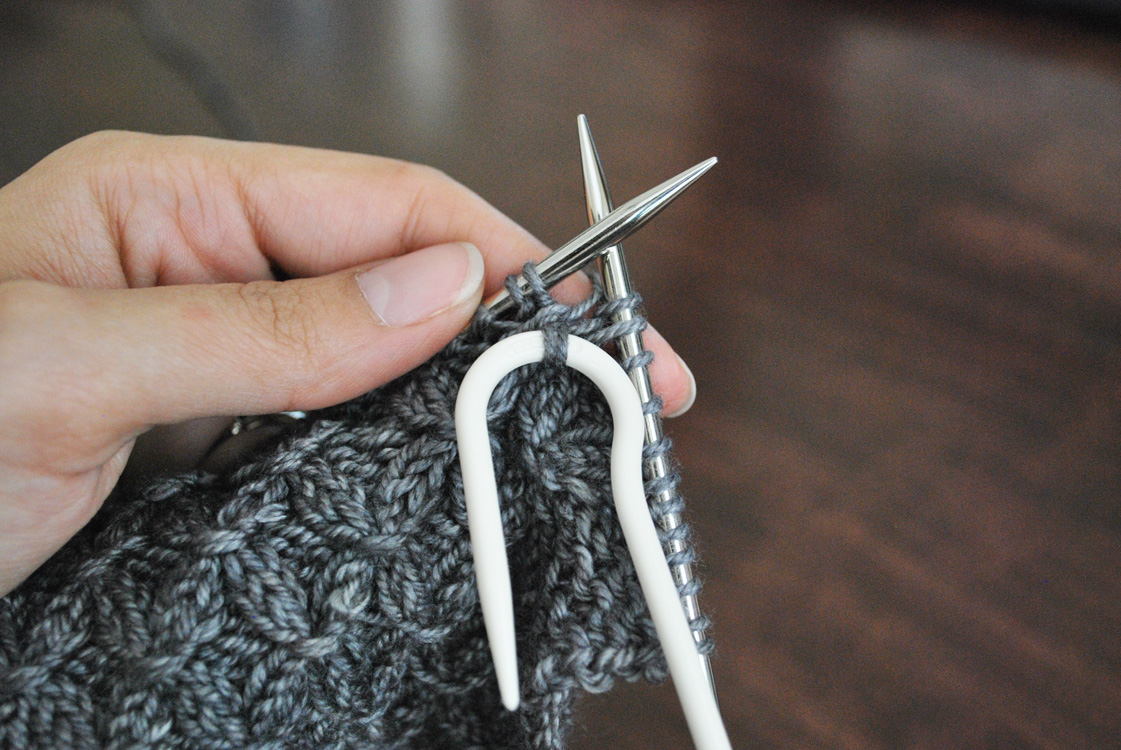
With the yarn in back of work, you will slip your first two stitches onto a cable needle and hold in front of work.


Bring yarn to the front of your work and slip the next two stitches to the right hand needle.


Bring your yarn to the back of the work again and slip the next two stitches to the cable needle.  You will now have 4 knit stitches total on the cable needle, and two purl stitches that you slipped to the right hand needle.


Now, you will wrap the 4 stitches on the cable needle using the working yarn twice (counter-clockwise).  It's a little fiddly, so probably not something you want to do in planes, trains and automobiles.


With the yarn held in front of work, slip the two stitches that you previously slipped to the right needle, back to the left needle.


Bring the yarn to the back of the work, ready to work a knit stitch.  Knit the first two stitches from the cable needle and leave the other two for now.


 Purl two stitches from the left hand needle.  Knit the last two stitches from the cable needle.


You're done, YAY!!!


See?  That wasn't so hard!

Now pat yourself on the back for trying something new cause you're awesome!

xoxo,
Liz

Thursday, November 10, 2011

You could win your Wish List

So yeah, there's this thing going on with Knit Picks, where you could win $50 of your wish list.  All you do is add items to your wish list, then share your list with a friend, and share on facebook or your blog.

Here's my hat in the ring!


http://www.knitpicks.com/cfCart/viewWishlist.cfm?wishlistid=CADA7104-219B-8E23-CC3FEE3005611E86&media=WLBL

Fingers crossed!

LOL, so apparently, because my mother used my account to place an order, her name is showing on the account now.  Pay no mind to that. It really is my cart...

xoxo,
Liz